Autochromes: The Tale of the Potato Starch
Click here for downloadable PDF version.
Introduction: a bit of background about colours
Do you know Albert Kahn? If not, look him up. Done? OK. So…
A few years back, I visited an Albert Kahn exhibition. I noticed some interesting labels describing the "autochrome", a technique invented by the Lumière brothers as early as 1903, to deliver coloured pictures – and pretty good ones. I had to picture (!) the system in my mind to understand how it works. I found it beautifully simple, and made a mental note to write a brief paper about it. But describing a mental picture is not that easy…
Plus, there is a bit of a prerequisite. Let’s start with that: what is colour? You may remember from Energy – Episode 1 that it’s about photons' frequencies. In fact, natural light is made of photons whose frequencies span over the whole visible spectrum. Their combination is perceived by our eyes as colourless, or "white". When light hits an opaque object, it gets reflected in all directions, with some photons being absorbed. And most objects absorb certain frequencies more than others – this depends on the energy levels of the electrons in the surface material of the object. An object’s colour is defined by the way it absorbs or reflects the frequencies of the visible spectrum. Only white or grey objects reflect/absorb all visible frequencies identically. Black objects absorb almost all visible frequencies.
Note that translucent/transparent object also have colours. Like opaque objects, they absorb photons selectively depending on their frequencies, but they let non-absorbed photons go through instead of reflecting them. This is what filters do. Now here is a neat property of the way we perceive colours: if you 1) select three filters of well-chosen "complementary" colours (i.e., letting through complementary sets of frequencies), then 2) throw beams of white light through them with the right intensities, and finally 3) recombine the three filtered light beams, you can "almost" create a light beam of any colour. "Almost" means that you don’t necessarily create the exact colour, but that our eyes will not make the difference. We can see an analogy with the way computers "code" colours with three "RGB" components (Red, Green, Blue).
How it works
Principle
Autochromes use this property in an incredibly smart way, to build colour slides with black-and-white plates and coloured "micro-filters" made of… minute flakes of dyed potato starch. The idea is to "powder" a sticky glass plate with an equal mix of "red, green, blue" flakes of potato starch before adding the "normal" black-and-white film that coats the plate. The trick is then to make sure that, when back-lit, the very small area of glass that supports each flake lets the right amount of light through, so that, combined with the light filtered by the neighbouring flakes, it recreates the colour of the picture in this micro-area. And the beauty is that, to achieve that, you have to do… nothing. Just take a black-and-white picture through this potato-starch-powdered plate. Let’s see why.
Implementation
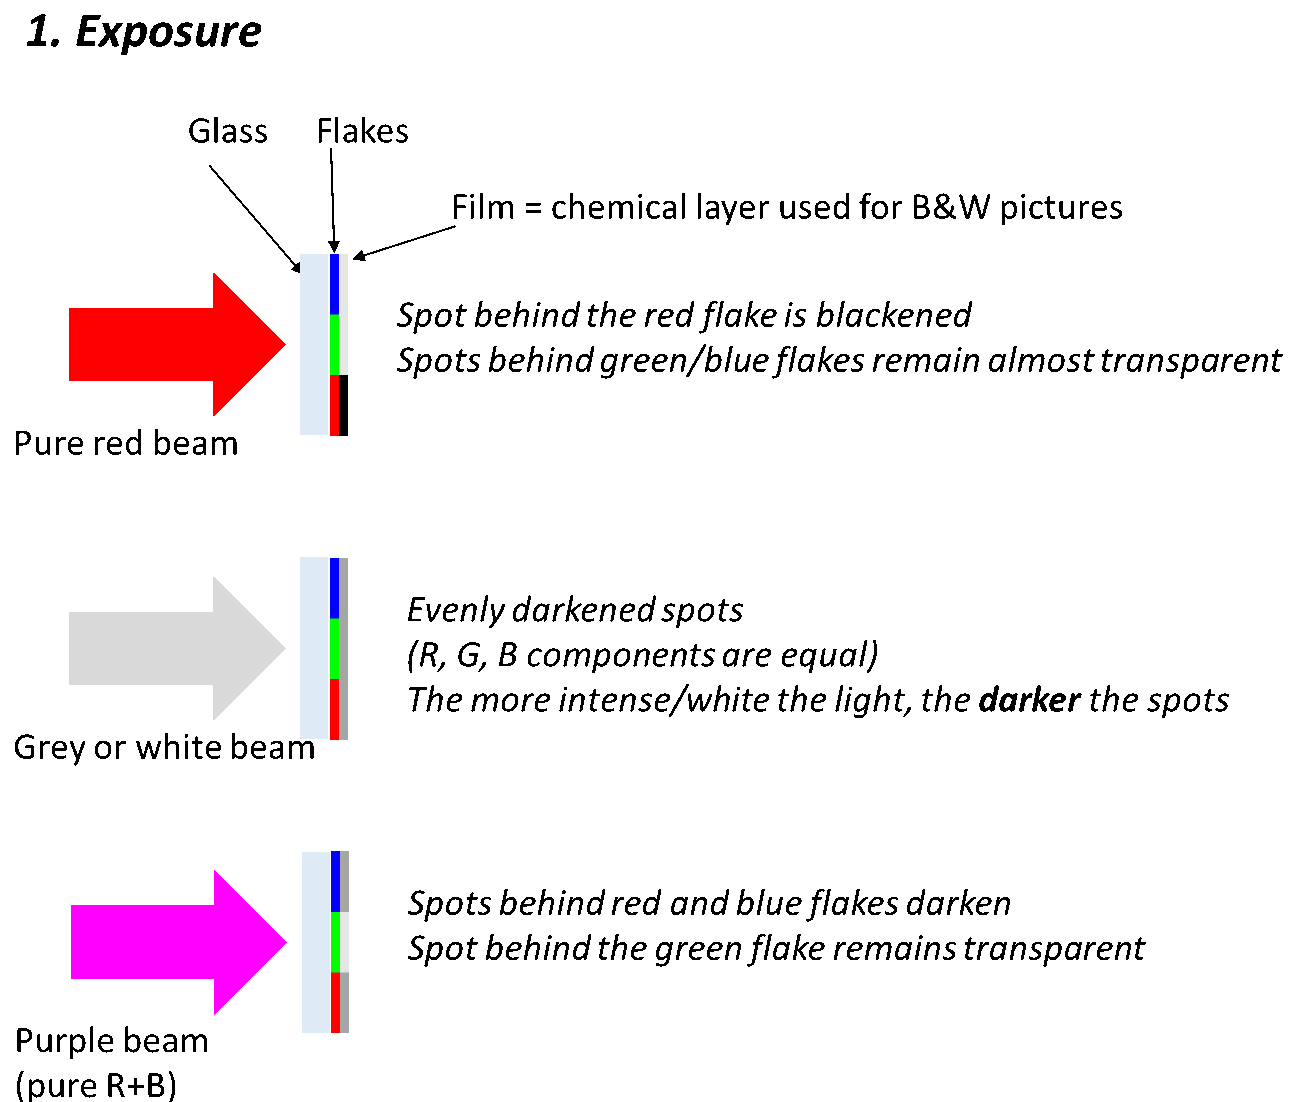
In a properly focussed camera, every light beam that emanates from a point of the subject and goes through the lens converges back to a single spot on the film – or, rather, on the plate, if we think early 20th century. If the pictured object is coloured, the light that "hits the spot" contains the mix of frequencies that defines the object’s colour. The problem, back in the 1910s, is that plates cannot detect this mix. They just react to the overall light intensity, which darkens them. Therefore they yield black-and-white negatives. Then "black-and-white technology" has smart ways to invert those negatives and turn them into "positive" black-and-white plates via appropriate chemical reactions.
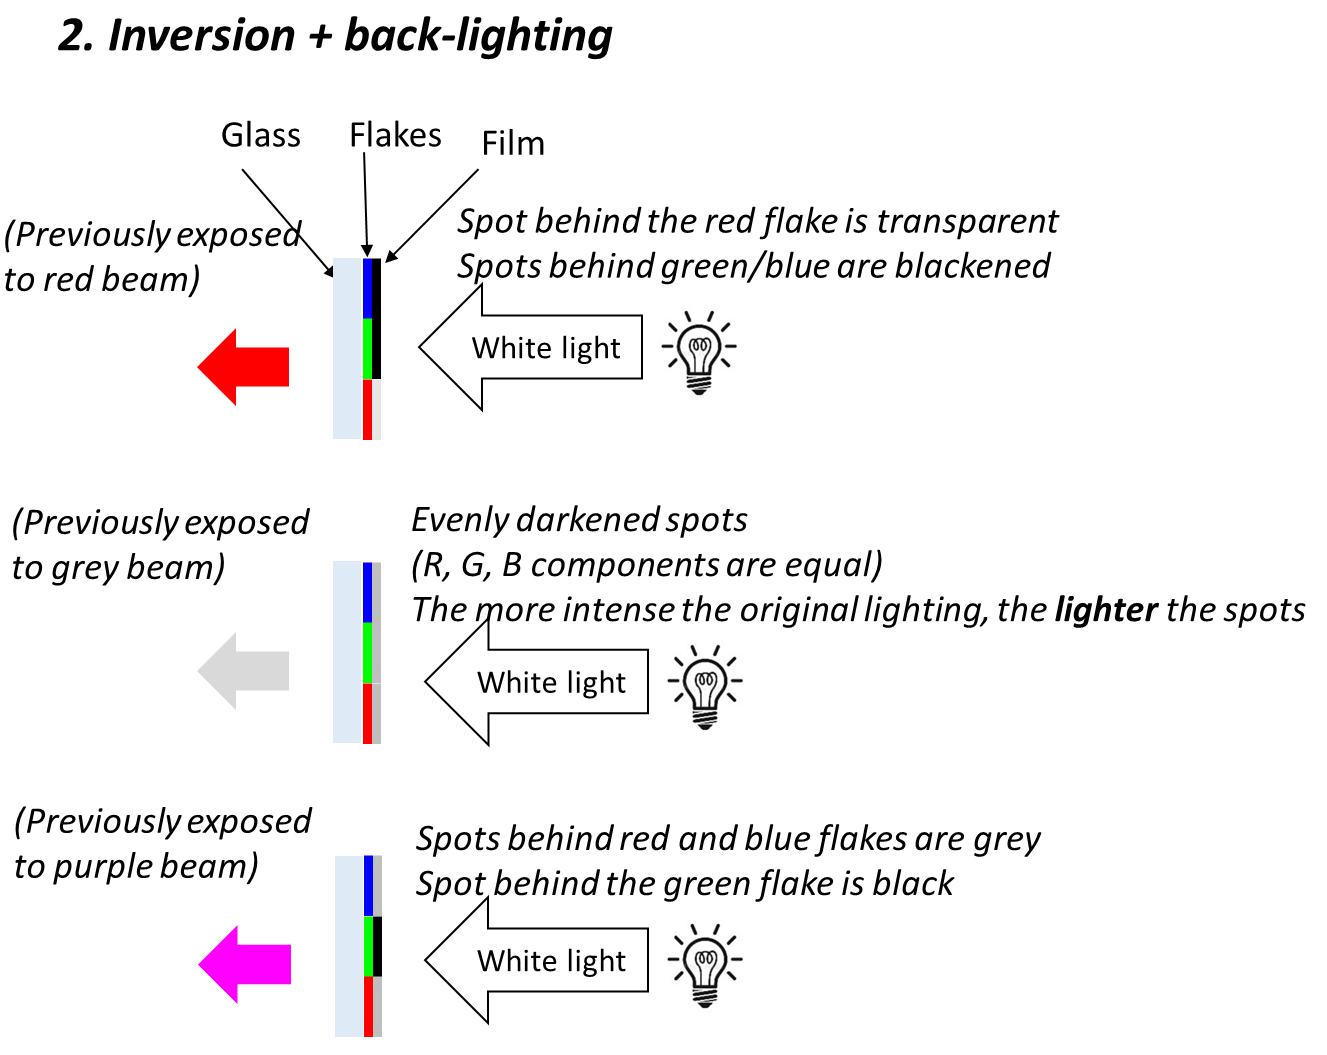
Now, if the plate is powdered with coloured "filters", the amount of light let through by each filter will depend on the colour of the incoming beam – hence of the pictured object. (From this point onwards, you may want to refer to the diagrams below.) A red beam will only go through red flakes and be blocked out by blue and green flakes. The glass spots behind the red flakes will be darkened, but those behind the blue/green flakes will not. If the beam’s colour is not "pure" red, blue, or green, then each filter will let the red/blue/green component of the beam go through and block the rest. Depending on the intensity of each component (i.e., on the beam’s exact colour and overall intensity), the coating behind the red/green/blue flakes will darken accordingly. After chemically inverting the plate, the coating’s grey shade behind each flake will reflect the intensity of the red/blue/green component we want to render: white for maximal intensity, black if the component is absent. All we have to do is back-light the plate. The flakes being too small for our eyes to distinguish them, we just see the combination of the light beams let through by adjacent flakes, i.e., the original colour! Sooo elegant.
More facts about the autochrome technique
Why potato starch? Because starch flakes, if small enough, are good micro-filters: translucent, able to absorb dye, they can be ground to very small sizes – around 10-20\$\mu\$m.
Sounds simple? Well, in practice, obtaining the right product is not that easy. You need to bleach the starch. You want homogeneous flake sizes. Add most importantly, you need a perfectly homogeneous mix of red/blue/green flakes: as you cannot sort them one by one on the glass, you have to rely on statistics to ensure that they are mixed together without any monochrome clusters that would unbalance the resulting colours. Also, the borders between flakes are not seamless – white light may go through and drown colours in a grey halo. The solution to this problem consists in filling the "gaps" with super-thin coal powder (1\$\mu\$m grains)… without covering or spoiling the flakes. Overall, although the principle sounds beautifully simple, its implementation requires quite a bit of know-how and industrial equipment.
Reed, green, blue, really? Not quite. In practice, autochrome used orange, green, and purple flakes. But it’s fine, as long as those colours complement each other well.
Colour rendition… The random distribution of red/blue/green flakes and the imperfect transparency of the "filters" create a characteristic patina, which I personally like a lot. A bit like old walls or paintings… Not so flashy, but quite charming and natural. You can find some samples here.
Any snags? Yes. Several.
First, autochrome makes very inefficient use of light intensity. Several reasons to this: starch flakes are more opaque than glass, meaning that even the frequencies they let through are significantly attenuated. Moreover, each red/green/blue component of the incoming light only hits a third of the plate’s surface – less than that, accounting for the surface covered with coal powder. As a result, even outdoor pictures require 10s exposure! Not very practical, although it can yield fun results: if someone stands still then moves away during exposure time, this person will be visible on the picture, but superimposed to the piece of landscape they uncovered when moving away. Note that while moving, the person will be invisible on the picture – they do not stay still long enough to print anything.
Second snag: producing autochrome plates was quite expensive. We have seen that starch homogeneity was not a given; in addition, applying the various layers of material on the plate was very delicate.
Third snag, making it worse: you cannot reproduce autochromes because you cannot separate the plates from the starch flakes, nor reproduce the distribution of red/green/blue flakes.
Because of these practical shortcomings, although autochrome was "ahead of the market" and yielded beautiful colours, it was supplanted by an American technology you might have heard of: Technicolor…